Headless WordPress: The Ups And Downs Of Creating A Decoupled WordPress


Headless WordPress: The Ups And Downs Of Creating A Decoupled WordPress
Headless WordPress: The Ups And Downs Of Creating A Decoupled WordPress
Denis Žoljom
2018-10-26T13:45:46+02:00
2018-10-26T11:53:47+00:00
WordPress came a long way from its start as a simple blog writing tool. A long 15 years later it became the number one CMS choice for developers and non-developers alike. WordPress now powers roughly 30% of the top 10 million sites on the web.
Ever since REST API was bundled in the WordPress core, developers can experiment and use it in a decoupled way, i.e. writing the front-end part by using JavaScript frameworks or libraries. At Infinum, we were (and still are) using WordPress in a ‘classic’ way: PHP for the frontend as well as the backend. After a while, we wanted to give the decoupled approach a go. In this article, I’ll share an overview of what it was that we wanted to achieve and what we encountered while trying to implement our goals.
There are several types of projects that can benefit from this approach. For example, simple presentational sites or sites that use WordPress as a backend are the main candidates for the decoupled approach.
In recent years, the industry thankfully started paying more attention to performance. However, being an easy-to-use inclusive and versatile piece of software, WordPress comes with a plethora of options that are not necessarily utilized in each and every project. As a result, website performance can suffer.
Recommended reading: How To Use Heatmaps To Track Clicks On Your WordPress Website
If long website response times keep you up at night, this is a how-to for you. I will cover the basics of creating a decoupled WordPress and some lessons learned, including:
Web forms are such an important part of the web, but we design them poorly all the time. The brand new Form Design Patterns book is our new practical guide for people who design, prototype and build all sorts of forms for digital services, products and websites. The eBook is free for Smashing Members.
Check the table of contents ↬
So, What Exactly Is A Decoupled WordPress?
When it comes down to how WordPress is programmed, one thing is certain: it doesn’t follow the Model-View-Controller (MVC) design pattern that many developers are familiar with. Because of its history and for being sort of a fork of an old blogging platform called “b2” (more details here), it’s largely written in a procedural way (using function-based code). WordPress core developers used a system of hooks which allowed other developers to modify or extend certain functionalities.
It’s an all-in-one system that is equipped with a working admin interface; it manages database connection, and has a bunch of useful APIs exposed that handle user authentication, routing, and more.
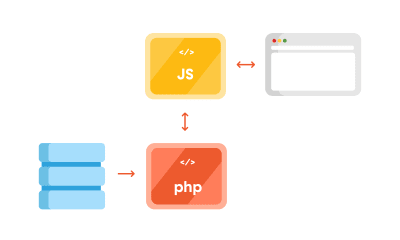
But thanks to the REST API, you can separate the WordPress backend as a sort of model and controller bundled together that handle data manipulation and database interaction, and use REST API Controller to interact with a separate view layer using various API endpoints. In addition to MVC separation, we can (for security reasons or speed improvements) place the JS App on a separate server like in the schema below:

Decoupled WordPress diagram. (Large preview)
Advantages Of Using The Decoupled Approach
One thing why you may want to use this approach for is to ensure a separation of concerns. The frontend and the backend are interacting via endpoints; each can be on its separate server which can be optimized specifically for each respective task, i.e. separately running a PHP app and running a Node.js app.
By separating your frontend from the backend, it’s easier to redesign it in the future, without changing the CMS. Also, front-end developers only need to care about what to do with the data the backend provides them. This lets them get creative and use modern libraries like ReactJS, Vue or Angular to deliver highly dynamic web apps. For example, it’s easier to build a progressive web app when using the aforementioned libraries.
Another advantage is reflected in the website security. Exploiting the website through the backend becomes more difficult since it’s largely hidden from the public.
Recommended reading: WordPress Security As A Process
Shortcomings Of Using The Decoupled Approach
First, having a decoupled WordPress means maintaining two separate instances:
Second, some of the front-end libraries do have a steeper learning curve. It will either take a lot of time to learn a new language (if you are only accustomed to HTML and CSS for templating), or will require bringing additional JavaScript experts to the project.
Third, by separating the frontend, you are losing the power of the WYSIWYG editor, and the ‘Live Preview’ button in WordPress doesn’t work either.
Working With WordPress REST API
Before we delve deeper in the code, a couple more things about WordPress REST API. The full power of the REST API in WordPress came with version 4.7 on December 6th, 2016.
What WordPress REST API allows you to do is to interact with your WordPress installation remotely by sending and receiving JSON objects.
Setting Up A Project
Since it comes bundled with latest WordPress installation, we will be working on the Twenty Seventeen theme. I’m working on Varying Vagrant Vagrants, and have set up a test site with an URL http://dev.wordpress.test/. This URL will be used throughout the article. We’ll also import posts from the wordpress.org Theme Review Teams repository so that we have some test data to work with. But first, we will get familiar working with default endpoints, and then we’ll create our own custom endpoint.
Access The Default REST Endpoint
As already mentioned, WordPress comes with several built-in endpoints that you can examine by going to the /wp-json/ route:
http://dev.wordpress.test/wp-json/
Either by putting this URL directly in your browser, or adding it in the postman app, you’ll get out a JSON response from WordPress REST API that looks something like this:
{
    "name": "Test dev site",
    "description": "Just another WordPress site",
    "url": "http://dev.wordpress.test",
    "home": "http://dev.wordpress.test",
    "gmt_offset": "0",
    "timezone_string": "",
    "namespaces": [
        "oembed/1.0",
        "wp/v2"
    ],
    "authentication": [],
    "routes": {
        "/": {
            "namespace": "",
            "methods": [
                "GET"
            ],
            "endpoints": [
                {
                    "methods": [
                        "GET"
                    ],
                    "args": {
                        "context": {
                            "required": false,
                            "default": "view"
                        }
                    }
                }
            ],
            "_links": {
                "self": "http://dev.wordpress.test/wp-json/"
            }
        },
        "/oembed/1.0": {
            "namespace": "oembed/1.0",
            "methods": [
                "GET"
            ],
            "endpoints": [
                {
                    "methods": [
                        "GET"
                    ],
                    "args": {
                        "namespace": {
                            "required": false,
                            "default": "oembed/1.0"
                        },
                        "context": {
                            "required": false,
                            "default": "view"
                        }
                    }
                }
            ],
            "_links": {
                "self": "http://dev.wordpress.test/wp-json/oembed/1.0"
            }
        },
        ...
        "wp/v2": {
        ...
So in order to get all of the posts in our site by using REST, we would need to go to http://dev.wordpress.test/wp-json/wp/v2/posts. Notice that the wp/v2/ marks the reserved core endpoints like posts, pages, media, taxonomies, categories, and so on.
So, how do we add a custom endpoint?
Create A Custom REST Endpoint
Let’s say we want to add a new endpoint or additional field to the existing endpoint. There are several ways we can do that. First, one can be done automatically when creating a custom post type. For instance, we want to create a documentation endpoint. Let’s create a small test plugin. Create a test-documentation folder in the wp-content/plugins folder, and add documentation.php file that looks like this:
From our sponsors: Headless WordPress: The Ups And Downs Of Creating A Decoupled WordPress
Related posts


