Archived
A Complete Guide To Routing In Angular


A Complete Guide To Routing In Angular
A Complete Guide To Routing In Angular
Ahmed Bouchefra
2018-11-28T15:00:49+01:00
2018-11-29T12:27:02+00:00
In case you’re still not quite familiar with Angular 7, I’d like to bring you closer to everything this impressive front-end framework has to offer. I’ll walk you through an Angular demo app that shows different concepts related to the Router, such as:
- The router outlet,
- Routes and paths,
- Navigation.
I’ll also show you how to use Angular CLI v7 to generate a demo project where we’ll use the Angular router to implement routing and navigation. But first, allow me to introduce you to Angular and go over some of the important new features in its latest version.
Introducing Angular 7
Angular is one of the most popular front-end frameworks for building client-side web applications for the mobile and desktop web. It follows a component-based architecture where each component is an isolated and re-usable piece of code that controls a part of the app’s UI.
A component in Angular is a TypeScript class decorated with the @Component decorator. It has an attached template and CSS stylesheets that form the component’s view.
Angular 7, the latest version of Angular has been recently released with new features particularly in CLI tooling and performance, such as:
- CLI Prompts: A common command like
ng addandng newcan now prompt the user to choose the functionalities to add into a project like routing and stylesheets format, etc. - Adding scrolling to Angular Material CDK (Component DevKit).
- Adding drag and drop support to Angular Material CDK.
- Projects are also defaulted to use Budget Bundles which will warn developers when their apps are passing size limits. By default, warnings are thrown when the size has more than 2MB and errors at 5MB. You can also change these limits in your
angular.jsonfile. etc.
Web forms are such an important part of the web, but we design them poorly all the time. The brand-new “Form Design Patterns” book is our new practical guide for people who design, prototype and build all sorts of forms for digital services, products and websites. The eBook is free for Smashing Members.
Check the table of contents ↬
Introducing Angular Router
Angular Router is a powerful JavaScript router built and maintained by the Angular core team that can be installed from the @angular/router package. It provides a complete routing library with the possibility to have multiple router outlets, different path matching strategies, easy access to route parameters and route guards to protect components from unauthorized access.
The Angular router is a core part of the Angular platform. It enables developers to build Single Page Applications with multiple views and allow navigation between these views.
Let’s now see the essential Router concepts in more details.
The Router-Outlet
The Router-Outlet is a directive that’s available from the router library where the Router inserts the component that gets matched based on the current browser’s URL. You can add multiple outlets in your Angular application which enables you to implement advanced routing scenarios.
<router-outlet></router-outlet>
Any component that gets matched by the Router will render it as a sibling of the Router outlet.
Routes And Paths
Routes are definitions (objects) comprised from at least a path and a component (or a redirectTo path) attributes. The path refers to the part of the URL that determines a unique view that should be displayed, and component refers to the Angular component that needs to be associated with a path. Based on a route definition that we provide (via a static RouterModule.forRoot(routes) method), the Router is able to navigate the user to a specific view.
Each Route maps a URL path to a component.
The path can be empty which denotes the default path of an application and it’s usually the start of the application.
The path can take a wildcard string (**). The router will select this route if the requested URL doesn’t match any paths for the defined routes. This can be used for displaying a “Not Found” view or redirecting to a specific view if no match is found.
This is an example of a route:
{ path: 'contacts', component: ContactListComponent}
If this route definition is provided to the Router configuration, the router will render ContactListComponent when the browser URL for the web application becomes /contacts.
Route Matching Strategies
The Angular Router provides different route matching strategies. The default strategy is simply checking if the current browser’s URL is prefixed with the path.
For example our previous route:
{ path: 'contacts', component: ContactListComponent}
Could be also written as:
{ path: 'contacts',pathMatch: 'prefix', component: ContactListComponent}
The patchMath attribute specifies the matching strategy. In this case, it’s prefix which is the default.
The second matching strategy is full. When it’s specified for a route, the router will check if the the path is exactly equal to the path of the current browser’s URL:
{ path: 'contacts',pathMatch: 'full', component: ContactListComponent}
Route Params
Creating routes with parameters is a common feature in web apps. Angular Router allows you to access parameters in different ways:
- Using the ActivatedRoute service,
- Using the ParamMap observable available starting with v4.
You can create a route parameter using the colon syntax. This is an example route with an id parameter:
{ path: 'contacts/:id', component: ContactDetailComponent}
Route Guards
A route guard is a feature of the Angular Router that allows developers to run some logic when a route is requested, and based on that logic, it allows or denies the user access to the route. It’s commonly used to check if a user is logged in and has the authorization before he can access a page.
You can add a route guard by implementing the CanActivate interface available from the @angular/router package and extends the canActivate() method which holds the logic to allow or deny access to the route. For example, the following guard will always allow access to a route:
class MyGuard implements CanActivate {
  canActivate() {
    return true;
  }
}
You can then protect a route with the guard using the canActivate attribute:
{ path: 'contacts/:id, canActivate:[MyGuard], component: ContactDetailComponent}
Navigation Directive
The Angular Router provides the routerLink directive to create navigation links. This directive takes the path associated with the component to navigate to. For example:
<a [routerLink]="'/contacts'">Contacts</a>
Multiple Outlets And Auxiliary Routes
Angular Router supports multiple outlets in the same application.
A component has one associated primary route and can have auxiliary routes. Auxiliary routes enable developers to navigate multiple routes at the same time.
To create an auxiliary route, you’ll need a named router outlet where the component associated with the auxiliary route will be displayed.
<router-outlet></router-outlet>
<router-outlet  name="outlet1"></router-outlet>
- The outlet with no name is the primary outlet.
- All outlets should have a name except for the primary outlet.
You can then specify the outlet where you want to render your component using the outlet attribute:
{ path: "contacts", component: ContactListComponent, outlet: "outlet1" }
Creating An Angular 7 Demo Project
In this section, we’ll see a practical example of how to set up and work with the Angular Router. You can see the live demo we’ll be creating and the GitHub repository for the project.
Installing Angular CLI v7
Angular CLI requires Node 8.9+, with NPM 5.5.1+. You need to make sure you have these requirements installed on your system then run the following command to install the latest version of Angular CLI:
$ npm install -g @angular/cli
This will install the Angular CLI globally.

Installing Angular CLI v7 (Large preview)
Note: You may want to use sudo to install packages globally, depending on your npm configuration.
Creating An Angular 7 Project
Creating a new project is one command away, you simply need to run the following command:
$ ng new angular7-router-demo
The CLI will ask you if you would like to add routing (type N for No because we’ll see how we can add routing manually) and which stylesheet format would you like to use, choose CSS, the first option then hit Enter. The CLI will create a folder structure with the necessary files and install the project’s required dependencies.
Creating A Fake Back-End Service
Since we don’t have a real back-end to interact with, we’ll create a fake back-end using the angular-in-memory-web-api library which is an in-memory web API for Angular demos and tests that emulates CRUD operations over a REST API.
It works by intercepting the HttpClient requests sent to the remote server and redirects them to a local in-memory data store that we need to create.
To create a fake back-end, we need to follow the next steps:
angular-in-memory-web-api module,In your terminal run the following command to install the angular-in-memory-web-api module from npm:
$ npm install --save angular-in-memory-web-api
Next, generate a back-end service using:
$ ng g s backend
Open the src/app/backend.service.ts file and import InMemoryDbService from the angular-in-memory-web-api module:
import {InMemoryDbService} from 'angular-in-memory-web-api'
The service class needs to implement InMemoryDbService and then override the createDb() method:
@Injectable({
  providedIn: 'root'
})
export class BackendService implements InMemoryDbService{

  constructor() { }
  createDb(){

   let  contacts =  [
     {  id:  1,  name:  'Contact 1', email: 'contact1@email.com' },
     {  id:  2,  name:  'Contact 2', email: 'contact2@email.com' },
     {  id:  3,  name:  'Contact 3', email: 'contact3@email.com' },
     {  id:  4,  name:  'Contact 4', email: 'contact4@email.com' }
   ];

   return {contacts};

  }
}
We simply create an array of contacts and return them. Each contact should have an id.
Finally, we simply need to import InMemoryWebApiModule into the app.module.ts file, and provide our fake back-end service.
import { InMemoryWebApiModule } from “angular-in-memory-web-api”;
import { BackendService } from “./backend.service”;
/* ... */

@NgModule({
  declarations: [
    /*...*/
  ],
  imports: [
    /*...*/
    InMemoryWebApiModule.forRoot(BackendService)
  ],
  providers: [],
  bootstrap: [AppComponent]
})
export class AppModule { }
Next create a ContactService which encapsulates the code for working with contacts:
$ ng g s contact
Open the src/app/contact.service.ts file and update it to look similar to the following code:
import { Injectable } from '@angular/core';
import { HttpClient } from “@angular/common/http”;

@Injectable({
  providedIn: 'root'
})
export class ContactService {

  API_URL: string = "/api/";
  constructor(private http: HttpClient) { }
  getContacts(){
   return this.http.get(this.API_URL + 'contacts')
  }
  getContact(contactId){
   return this.http.get(`${this.API_URL + 'contacts'}/${contactId}`)
  }
}
We added two methods:
getContacts()
For getting all contacts.getContact()
For getting a contact by id.
You can set the API_URL to whatever URL since we are not going to use a real back-end. All requests will be intercepted and sent to the in-memory back-end.
Creating Our Angular Components
Before we can see how to use the different Router features, let’s first create a bunch of components in our project.
Head over to your terminal and run the following commands:
$ ng g c contact-list
$ ng g c contact-detail
This will generate two ContactListComponent and ContactDetailComponent components and add them to the main app module.
Setting Up Routing
In most cases, you’ll use the Angular CLI to create projects with routing setup but in this case, we’ll add it manually so we can get a better idea how routing works in Angular.
Adding The Routing Module
We need to add AppRoutingModule which will contain our application routes and a router outlet where Angular will insert the currently matched component depending on the browser current URL.
We’ll see:
- How to create an Angular Module for routing and import it;
- How to add routes to different components;
- How to add the router outlet.
First, let’s start by creating a routing module in an app-routing.module.ts file. Inside the src/app create the file using:
$ cd angular7-router-demo/src/app
$ touch app-routing.module.ts
Open the file and add the following code:
import { NgModule } from '@angular/core';
import { Routes, RouterModule } from '@angular/router';

const routes: Routes = [];

@NgModule({
  imports: [RouterModule.forRoot(routes)],
  exports: [RouterModule]
})
export class AppRoutingModule { }
We start by importing the NgModule from the @angular/core package which is a TypeScript decorator used to create an Angular module.
We also import the RouterModule and Routes classes from the @angular/router package . RouterModule provides static methods like RouterModule.forRoot() for passing a configuration object to the Router.
Next, we define a constant routes array of type Routes which will be used to hold information for each route.
Finally, we create and export a module called AppRoutingModule(You can call it whatever you want) which is simply a TypeScript class decorated with the @NgModule decorator that takes some meta information object. In the imports attribute of this object, we call the static RouterModule.forRoot(routes) method with the routes array as a parameter. In the exports array we add the RouterModule.
Importing The Routing Module
Next, we need to import this module routing into the main app module that lives in the src/app/app.module.ts file:
import { BrowserModule } from '@angular/platform-browser';
import { NgModule } from '@angular/core';

import { AppRoutingModule } from './app-routing.module';
import { AppComponent } from './app.component';

@NgModule({
  declarations: [
    AppComponent
  ],
  imports: [
    BrowserModule,
    AppRoutingModule
  ],
  providers: [],
  bootstrap: [AppComponent]
})
export class AppModule { }
We import the AppRoutingModule from ./app-routing.module and we add it in the imports array of the main module.
Adding The Router Outlet
Finally, we need to add the router outlet. Open the src/app/app.component.html file which contains the main app template and add the component:
<router-outlet></router-outlet>
This is where the Angular Router will render the component that corresponds to current browser’s path.
That’s all steps we need to follow in order to manually setup routing inside an Angular project.
Creating Routes
Now, let’s add routes to our two components. Open the src/app/app-routing.module.ts file and add the following routes to the routes array:
const routes: Routes = [
    {path: 'contacts' , component: ContactListComponent},
    {path: 'contact/:id' , component: ContactDetailComponent}
];
Make sure to import the two components in the routing module:
import { ContactListComponent } from './contact-list/contact-list.component';
import { ContactDetailComponent } from './contact-detail/contact-detail.component';
Now we can access the two components from the /contacts and contact/:id paths.
Adding Navigation Links
Next let’s add navigation links to our app template using the routerLink directive. Open the src/app/app.component.html and add the following code on top of the router outlet:
<h2><a [routerLink] = "'/contacts'">Contacts</a></h2>
Next we need to display the list of contacts in ContactListComponent. Open the src/app/contact-list.component.ts then add the following code:
import { Component, OnInit } from '@angular/core';
import { ContactService } from '../contact.service';

@Component({
  selector: 'app-contact-list',
  templateUrl: './contact-list.component.html',
  styleUrls: ['./contact-list.component.css']
})
export class ContactListComponent implements OnInit {

  contacts: any[] = [];


  constructor(private contactService: ContactService) { }

  ngOnInit() {
    this.contactService.getContacts().subscribe((data : any[])=>{
        console.log(data);
        this.contacts = data;
    })
  }
}
We create a contacts array to hold the contacts. Next, we inject ContactService and we call the getContacts() method of the instance (on the ngOnInit life-cycle event) to get contacts and assign them to the contacts array.
Next open the src/app/contact-list/contact-list.component.html file and add:
<table style="width:100%">
  <tr>
    <th>Name</th>
    <th>Email</th>
    <th>Actions</th>
  </tr>
  <tr *ngFor="let contact of contacts" >
    <td>{{ contact.name }}</td>
    <td>{{ contact.email }}</td>
    <td>
    <a [routerLink]="['/contact', contact.id]">Go to details</a>
    </td>
  </tr>
</table>
We loop through the contacts and display each contact’s name and email. We also create a link to each contact’s details component using the routerLink directive.
This is a screen shot of the component:
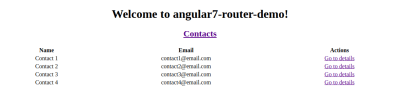
Contact list (Large preview)
When we click on the Go to details link, it will take us to ContactDetailsComponent. The route has an id parameter, let’s see how we can access it from our component.
Open the src/app/contact-detail/contact-detail.component.ts file and change the code to look similar to the following code:
import { Component, OnInit } from '@angular/core';
import { ActivatedRoute } from '@angular/router';
import { ContactService } from '../contact.service';

@Component({
  selector: 'app-contact-detail',
  templateUrl: './contact-detail.component.html',
  styleUrls: ['./contact-detail.component.css']
})
export class ContactDetailComponent implements OnInit {

  contact: any;
  constructor(private contactService: ContactService, private route: ActivatedRoute) { }

  ngOnInit() {
    this.route.paramMap.subscribe(params => {
    console.log(params.get('id'))
     this.contactService.getContact(params.get('id')).subscribe(c =>{
        console.log(c);
        this.contact = c;
    })
    });

  }
}
We inject ContactService and ActivatedRoute into the component. In ngOnInit() life-cycle event we retrieve the id parameter that will be passed from the route and use it to get the contact’s details that we assign to a contact object.
Open the src/app/contact-detail/contact-detail.component.html file and add:
<h1> Contact # {{contact.id}}</h1>
<p>
  Name: {{contact.name}}
</p>
<p>
 Email: {{contact.email}}
</p>

Contact details (Large preview)
When we first visit our application from 127.0.0.1:4200/, the outlet doesn’t render any component so let’s redirect the empty path to the contacts path by adding the following route to the routes array:
{path: '', pathMatch: 'full', redirectTo: 'contacts'}
We want to match the exact empty path, that’s why we specify the full match strategy.
Conclusion
In this tutorial, we’ve seen how to use the Angular Router to add routing and navigation into our application. We’ve seen different concepts like the Router outlet, routes, and paths and we created a demo to practically show the different concepts. You can access the code from this repository.
![]()
(dm, ra, yk, il)
From our sponsors: A Complete Guide To Routing In Angular


